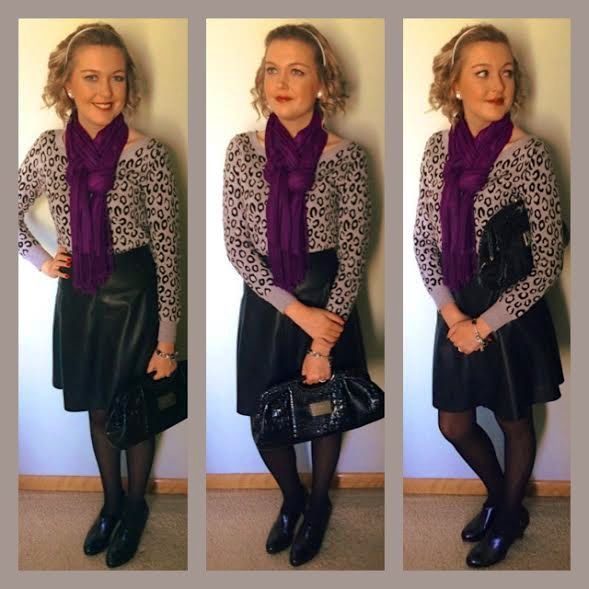
 Going to events and meeting new people can be a daunting task. The invitations are vague about the dress code and walking into a room full of strangers is less than inviting. I enjoy meeting new people and seeking out new professional opportunities, but gearing up for these events takes some prep work. Recently, I had the chance to attend a networking business dinner and a professional development conference. These two events had different purposes, and with that, there were different dress codes. I turned to my cousin, Emily, for some styling help. I drew some inspiration from her recent blog and put my twist on things. For the first event, I was representing the Society for Collegiate Leadership as the founding president. It was a dinner to network with classmates at The University of Toledo, meet faculty, and as a bonus, we had an etiquette expert give us some pointers during dinner. This was a business attire event. I sifted through my closet to pull outfits together, and once I settled on one, I quickly realized my skirt was two sizes too big. That meant I was on the hunt for a new one. I opted instead of replacing my pencil skirt with another one, to update it with an edgier, leather A-line skirt. Since this spring season is far from warm, I paired my new skirt with an animal-print, boat-neck sweater, and black tights. This event followed a class on campus, so comfortable shoes were necessary. I love my pair of shooties, and they added a nice touch to my outfit. A splash of color from a purple scarf popped against the grey and black combination. My outfit was a great mix of textures and classic colors. I had many compliments, but above all, I looked professional.
The second event was a professional development conference in my future career field. This conference threw a curveball at me in deciding what I should wear. It was on a Saturday, yet I was not only representing me, but I was also representing The University of Toledo. Although a dress code was not set, I decided I would go with business casual. That is generally a safe bet to make if a dress code is not stated. I wanted to be comfortable since it was an all-day event and it was a Saturday after all. A classic color combination of beige and black is a professional winner any day. I usually shy away from ponchos, but because this one had sleeve cuffs to keep it from spinning around, I thought it would work for this. Since it was an oversized and loose-fitting style, I went with black leggings as a slenderizing feature of the outfit. Again, I wore my comfortable shooties to add some height, and because I love a comfy heel.
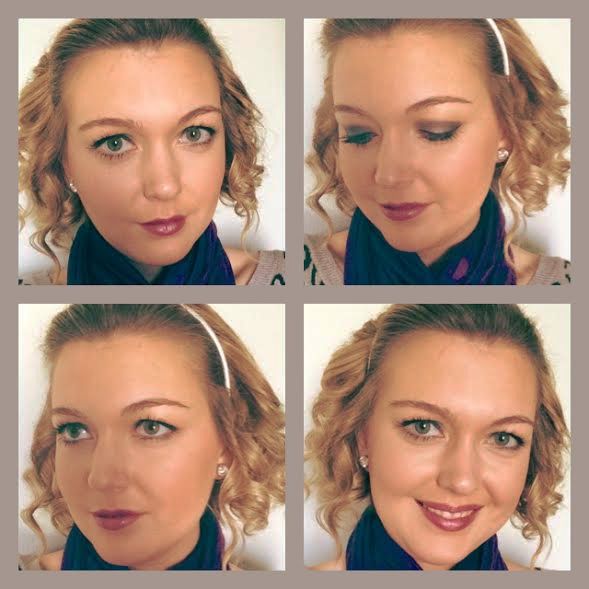
My hair and makeup choices differed greatly between these two looks. At the networking dinner, I went a little sassier than I ordinarily go. I went full volume with my hair by using a curling wand, and I stuck in a silver, satin headband to keep the curls from falling forward. I tend to fidget when I am uncomfortable in new social settings, so I wanted to avoid a nervous habit of playing with my hair by keeping it out of my face entirely. My makeup was done using my favorites. I was particularly happy with the plum smokey eye to compliment my purple scarf. A fun purple lip rounded out this look. As for my business-casual look, I went for a more natural and subtle look. My hair was left straight, and I pulled back the front part with some bobby pins to keep me from constantly having to tuck it behind my ear. I had a lighter hand with my application of foundation and eye shadow since this was a daytime look, and because I was wearing my glasses, my makeup was not going to be the focal point, but that was okay. Even though I used the same makeup products for both of my looks, I was still able to create a bold look and a subdued look with minimal fuss. The accessories for both looks were minimal. I kept things simple since. For the dressier look, I chose studded-stone earrings, a Pandora bracelet from Venice, and my favorite ring from Austria. I decided to use an oversized clutch as my purse to carry the necessities, and as a place to hold the business cards I collected from the night. For my other look, I wore vintage-looking triangular gold earrings, an accent gold ring, and a Fossil watch. Because the format of the conference was more time-based than the dinner, I swapped out a bracelet for a watch to be mindful of the schedule without having to reference my phone all day. My purse for the day was the bag I use for going to class. It did not necessarily match my outfit, but I let that one slide because I was carrying some extra school work with me, a notebook to take notes from the lectures, and I will be honest, it was just easier to keep that bag intact for the coming school week. It was fun to get all dolled up for both occasions. No matter where you may be going, think about the purpose of the event, whom you are representing, and what kind of setting it will be. Your wardrobe options are endless, but be sure to be practical and do not be afraid to play around with colors, textiles, and patterns. Not every event warrants a brand-new outfit, but it never hurts to spruce up an old outfit with a new flare added. I think I made a bold, professional statement with these two styles. So the next time you have a business dinner or work conference, remember to be on your A-game when it comes to networking and dress for success. Stay Curious, Kayla ©Inquisitive Perspectives 2017
0 Comments
 Packing can be a nightmare, especially for first-time travelers. It was intimidating during my first trip, but by the end of the three weeks, I was a packing pro. Every time I had to pack, I thought of the task as a game of Tetris. The contents of my suitcase had to fit perfectly in place. The real challenge was finding room for the new items I bought along the way. I hope this video will help you when it comes time for you to pack up and go on a trip. Grab a pen and some paper, so you do not miss any of these tips and tricks for the essentials of packing. Stay Curious, Kayla ©Inquisitive Perspectives 2017  My room renovation catapulted me into this organization tailspin, and while I still have quite a bit more to do, tackling my makeup drawers was a big accomplishment. I think it is every girl’s dream to have a designated makeup space that is first and foremost function, but deep down, we want it to be an artistic display too. It seems like my collection has grown so much from my first little stash, and I will be honest, my organization of it has not been the greatest, until now. Rather than organizing my collection as it grew, I just tried to make it fit in the drawer. With this round of organizing everything, I emptied the drawers, cleared out the products I no longer used and was ready to start all over. I knew I had to maximize the space I had already designated for makeup. To do this, I wanted to invest in storage containers. My first thought was to enter the world of The Container Store, but that was not practical for two reasons: the drive and the cost. There is not a store near me, and although I was willing to go out of my way to find one, it was not worth that time. The other problem I had was the high prices of the products I was looking to buy. After this discovery, I clicked over to my favorite online shopping site. I can find anything and everything I need on Amazon, so I do not know why I did not start here first. My search came up with exactly what I was looking for, and because the price was so great, I got more bang for my buck. The clear acrylic storage units were perfect, and I liked the drawer unit so much, I ordered another unit to finish the job. The sleekness and ability to clean the trays and drawers out were what drew me to this option. I love that these were made to stack on top of each other; I would much rather have vertical space be taken up than horizontal space. The top unit is dedicated to my Bare Mineral pigment pots since they should lay flat to avoid a mess. The bottom unit is for my lip products, and one drawer is for the overflow of eyeliners, chubby sticks, and whatever else did not have a home. As for the configuration of my dresser drawers, the top three are the permanent home to my makeup. The left drawer is my overflow stash. This is where I have some unopened duplicates, odds and ends, and some palates I am not willing to part with, but they are not my everyday picks. My middle drawer is where my must-haves and top-picks reside. This is by far my most used makeup, and the convenient trays make use and clean up a breeze. The right drawer is a combination of hair accessories and makeup supplies. A container for bobby pins and clips are in the back, while brushes and lotions are taking up the rest of the space. No matter how big or small your makeup collection is, we can all use some organization. My organization haul cost about sixty dollars, but it was well worth every dollar. This is going to be a lasting setup. I have wanted to do something like this for a while now, but like just about everything in my life, if it is not related to school, it does not get done with high priority. I am happy with the result, and I am even more delighted that spring cleaning came early. Stay Curious, Kayla ©Inquisitive Perspectives 2017  I have been trying to redecorate my room for months! As you can probably guess, life happened and time got away from me. I have been saying that about a lot of things lately. Whoops! Anyway, the last time I redid my room I basically changed the wall color and comforter. It was a relatively simple and quick fix. This time around was more of a process, considering a decade had gone by, and I was ready for the adult room I have been envisioning for a while. Since this process began this summer, I have had plenty of time to think about what and how I wanted things. Obviously, how I imagined things in my head were not quite in alignment with reality, but I must say it turned out looking great for my liking. I am going to hit the highlights, low moments, and some tips and tricks. This was my first experience redecorating as a solo effort, as far as design and the expenses of said redo. I was not too sure of my interior design skills, but I took my cue from HGTV. Usually, I would scour Pinterest for ideas, but I did not want to get caught up in the overly trendy and expensive designs. I wanted my room to be a comfy and cozy place to come to after a long day at school, so that was my design inspiration. I wanted calming colors that would also spark some creativity when it came to working on homework and writing. My eye has been drawn to everything yellow in recent months, so that was my starting point. I have never been brave enough to mix colors for rooms, but I fell in love with a set of sheets at Macy’s and had to have them. The floral pattern confirmed the rest of my color scheme. My colors for my updated room became pale yellow, rosy pink, and sage green. When I was little, I hated the color yellow, I was not a girl who fawned over pink, and green just was not a favorite. Now, I am head over heels with these colors. I attacked this project a little backward. What else is new? I was worried I had hastily chosen sheets before I could find coordinating pieces for my room. The hunt for a comforter was on, and I was having no luck. I had browsed the web on Wayfair, Overstock, Kohl’s, JC Penney, Carson’s, Bed Bath & Beyond, and could not find anything that matched, let alone something I remotely liked. I had given up for the time being and figured I would just have to shop around some more, and when I saw it, I would know. Fast forward a few months to Kohl’s right after Christmas. I just happened in there because of their larger-than-life-after-Christmas sale. I had no intentions of buying anything, but I could not help myself when I saw a simple sage green quilt set. The sale plus and additional coupon made this impulse buy a no-brainer. Since it was not a bed-in-a-bag set, I had to buy the set as individuals. It did not have a matching bed skirt, but a plain, crisp white box pleat did the trick, and it compliments my window treatment. With my bed set search complete, I could commit to this project and finally pick out paint colors. I would like to think I have a good eye when it comes to color, but I was not too confident in this. I looked at every pale-yellow paint chip Lowe’s had to offer. I came home with four almost identical, yet somewhat different, variations of yellow. After comparing for a while, I picked “Summer Moon.” I still cannot adequately describe the color, except that I love it. One of my must-haves and most essential items I had to include in this room redo was a desk, a big desk at that. I have always had a little one in my room, but I had outgrown it long ago. Again, my internet searches returned no perfect matches to what I wanted. Being that I have a handyman for a dad, I sketched out the desk I had envisioned the best I could. I showed it to my dad, and ta-da, a custom desk appeared! This was a huge money saver, and it is special because it was made with love. This endeavor provided me the perfect opportunity to clean up and clear out. I emptied shelves that have not been bare in years, and I think I finally caught up on all laundry in the process. I went through clothes and made room for more (like I need any more clothes, but I cannot help it). My room got a deep clean and some tender loving care. My dad was a trooper in regards to moving the heavy boxes of books and rearranging my even heavier furniture before we dove in and painted the walls. Right when we thought the hard part was over with moving furniture, we had a horrible experience with the paint I had chosen. The color was beautiful, but the coverage was awful. I was covering a pastel color with another pastel color with supposedly “one-coat” paint by Valspar. What should have taken one gallon, one coat, and one day, took two gallons, three coats, and three days to paint. I was frustrated. This was taking more time than I really had, and neither one of us was having a good time at this point. Ultimately, the company took care of this debacle, but it threw a wrench in our momentum. Now that this project was back on track, I could hit the stores again and put the finishing touches on my room. I still needed lamps and some accent pieces. I did not know what kind of lamps I wanted, but I did not care all that much. Anything was better than the plain white ones I had before. I stumbled on pale-yellow porcelain lamps at TJ Maxx. The diamond pattern paired with the squared and squatty base of the lamp made them the perfect fit, and the price was pretty too. A throw pillow, towel as a dresser runner, fabric for my desktop, and a typographic art piece rounded out my shopping spree. My room came together nicely. After a paint mishap and the overall project taking much longer than I anticipated, I am happy with the end results. I could not have done it without my dad doing most of the hard work, and my mom making sure my colors all matched. It really does take an army to anything done. Tips and Tricks Shop the sales! Just about everything I bought was either on sale or the price was low to begin with. I did not set a strict budget, but I certainly was aware of what I was spending. I kept the receipts of my big buys just to keep in check with my money. Shop with a swatch! I took a pillow case from my sheet set with me everywhere for about a week while I was trying to pull it all together. I hate returning items to the stores, so it was easier to make sure it was right from the start. Shop or DIY? I am the first to admit that DIY projects scare me. I am intimidated by them because I know I cannot compete with Chip and Joanna. I have no shame in buying things, but there came a point when I knew buying a desk and settling on it was not worth any amount of money. I pulled features from desks I saw and combined them into one dream desk. I hate writing on wood grain, so my solution for this was to wrap the desktop in fabric and lay a piece of plexiglass over it. This added a pop of color at my desk and created a perfectly smooth writing surface. Reuse, reface, repurpose! Not everything was brand new for this redo, in fact, all my furniture remained. With the new position of my bed, I did not have a use for my night-side tables. I was not willing to give up the storage, nor was I ready to part with them altogether. They became the base for my desk, and that was one less thing I had to worry about and one less think my dad had to build. It was a win-win. Some of my other decorative pieces in my room were still good to use, but need a facelift. The colors needed to be updated, and more recent pictures replaced old ones. I am still trying to sort through the boxes I packed away, but at least it is functional. I can work on getting everything put back on a rainy day. This was fun to do, but I do not intend on redoing my room anytime soon. I learned what to do and what not to do, but I would not expect anything less in life. As for now, I am enjoying the simple, cozy, and inviting space created by this room renovation. Stay Curious, Kayla ©Inquisitive Perspectives 2017  The holiday season is upon us! I for one, look forward to spending time with family, eating the holiday treats, and having some solid excuses for playing with makeup. I find myself experimenting with new products and trying new looks. There are endless possibilities when it comes to makeup. I am by no means a professional, but that is not stopping me. I live for holiday, special-edition eyeshadow palettes. I usually try to catch Cyber Monday sales from Ulta or Sephora for my yearly haul and birthday presents. Now, some may be wondering how I shop online for makeup without seeing it in person and swatching to color match. I try to stop by the stores to swatch and compare products, and between rubbing makeup all over my arms and actually purchasing it, I watch YouTube videos for reviews. This year, I had to do a drugstore haul to restock some of the staples, and I was curious to test out some new finds. These products I am dubbing my favorites are a mix of drugstore deals and higher end treasures. I am just going to dive into my collection and pick my top picks. 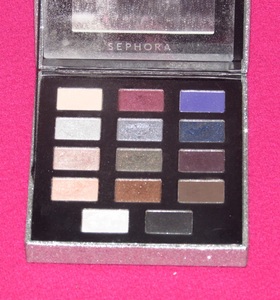 This Sephora holiday special was the first glimpse into the possibilities of what the holidays could bring in the makeup world. I am a sucker for packaging, and this was no different. Who does not love a sparkly, perfectly silver box filled with eyeshadows? The colors are right up my alley, and the shimmer tones are not too overpowering. The burgundy-wine pigment quickly became my favorite from the palette. The olive-green is a close second; they both get their fair share of wear. 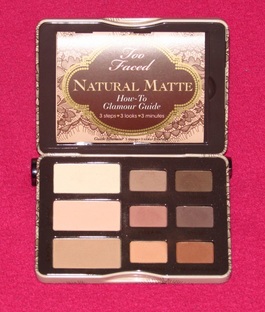 The Natural Matte palette by Too Faced is one of my newer finds. Within this last year of having it, it has become my go-to for quick looks, as I am running out the door before school. The pigments are subtle but silky. My top three colors are “Lace Teddy,” “Strapless,” and “Cashmere Bunny.” This palette offers warm colors with a natural color payoff. I also love the metal case with embossing and lacey appliqué look. 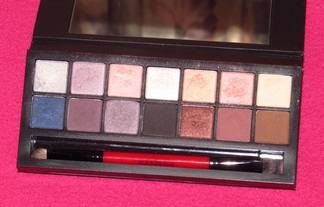 Smashbox never fails to deliver. Their Double Exposure palette was a gift from my uncle and cousin for my birthday last year. Emily loves makeup, and I think it is safe to say, she founded my love for makeup too. If I want a darker, more dramatic look, this is the palette I head for. The pigments are unique; when used wet, they change their appearance. Some turn metallic, while the intensity changes for others. It is hard to pick some favorites from this one because I like so many for different reasons, but if I had to pick, “Fig” and “Flushed” rank as my most used. Emily is also a blogger. A family that blogs together stays together. Go check out her Life+Style blog, Emily Essentially.  The holy grail of bareMinerals holiday collections was a find from my last Ulta haul. I tucked it away in my makeup drawers and recently fell back in love with it. I tend to get stuck in a rut of makeup products and have to go shopping through my own stash to rotate my products. I remember getting my first bareMinerals pigment pots, and I thought I was all that and a box of chocolates. Since then, my collection is overflowing, but that has not curbed my habit. This holiday box has eight, shimmery and frosty loose pigments. I was happy to see “Cupcake” in the full size to replace the very first one my parents bought me years ago. “Strawberry Mousse” and “Angel Food Cake” are top contenders with “Cupcake” as my favorites. 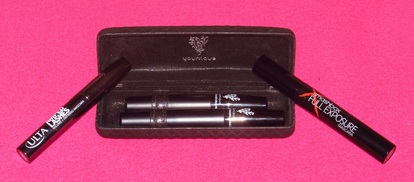 No eye look is complete without eyeliner and some mascara. I have not singled in on an absolute favorite eyeliner, so I am moving straight into mascara. I chose three for specific reasons. First up is Ulta’s Amped Lashes. The wand is small and the formula is smooth. For a quick daytime look, this is always my top pick. The Smashbox Full Exposure mascara offers a little more volume and length. The wand applicator is twice the size of Ulta’s mascara, but that is where precision goes a long way. The last mascara I deem as a favorite has had some mixed reviews, but I have never had any problems with it. The 3D Lash Fibers by Younique has gone through some formula changes, but I am still using the original formula. This is the perfect mascara for a dramatic eye for special occasions. I do not know how many times I have been asked what falsies I am wearing, when in reality, I just have my natural lashes coated with Younique. 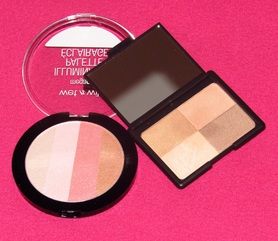 I am relatively new to the contour and highlight party, but I am loving it. Since I am still experimenting with my technique, I was not willing to pay for the high-end products. I have seen many YouTubers do the drugstore makeup challenge, and the Wet ‘n’ Wild Illuminating Highlight compact was the most used among YouTubers, so that seemed like the safe option. A little bit goes a long way, but the glowing shimmer is glorious. As for bronzer, I did not want an overpowering brown color, so I turned to Elf’s Golden Bronzer. The warm combination of the two compliment the cool-tone blush I tend to gravitate towards. 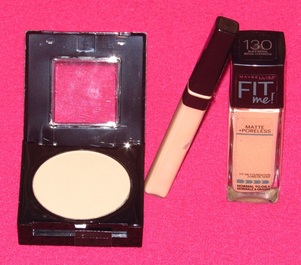 None of the previously mentioned products would be anything without a solid foundation. I have been testing out foundations for some time. I narrowed in on Maybelline’s Fit Me Matte+Poreless powder foundation in the color 130-Buff Beige about a year ago, and I fell in love with the product. I have always steered away from liquid foundation because I have combination skin, and did not want the dewy and oily finished look. I finally decided to try the liquid formula in the same color, and I could not be happier with the product (a pump would be the only thing to make it better). It gives the perfect airbrushed finish and to set the foundation, I conservatively use the powder, especially in my oily spots, to ensure the coverage stays all day. The concealer I use is Maybelline’s Fit Me in 15-Fair Clair. It is one shade lighter than the foundation, and it brightens my tired, college-formed, dark circles.  Eye primer has been a staple in my makeup routine for years, but face primer is new for me. I often times would just put moisturizer on after my shower, and I would consider it good. Since I was upping my makeup game, I thought it was time to see what the hype was all about. I chose this inexpensive option for a primer from Elf. They had some good options for primer, depending on skin type. I have a relatively even skin tone, so I chose the Poreless Face Primer. It comes in a pale, baby pink bottle, but the product itself is white and goes on clear. It is scented; at first, I was not too sure about it, but the minty scent has grown on me. A teeny, tiny bit goes a long way. It leaves my face feeling so good and refreshed. As for eye primer, the only one I have ever used is Urban Decay’s Eyeshadow Primer Potion. I use the original formula in the purple tube. Why try others when the first one worked?! I hate when shadows crease halfway through the day, and with this magical potion, my eyeshadow looks flawless.  Lips make the makeup look. One makeup look can be transformed into four just by swapping out the lip color. My collection of lip products was the first of my overall makeup collection. I was notorious for nabbing my mom’s almost-empty lipstick tubes and weaseling a lip gloss buy out of grocery shopping when I was little (okay, maybe I still do this). This season’s trend of matte lip colors helped me narrow down my favorites at the moment. The Elf matte sticks are creamy and never dry, so although matte, they feel more like a lip crayon or buttery lipstick. I chose “Tea Rose” and “Wine” as my top picks. I have a nude color too, but the shade is not the most appealing on my skin tone. The liquid lip colors from Wet ‘n’ Wild’s Megalast line are indeed long lasting. This is the first time I have used a matte liquid, and I love the colors I chose (“Rose to the Occasion” and “High-Pitched Wine”), but the application was a challenge. These will take some time getting used to because between the application and drying sensation, they are not like anything I have ever worn before. I put a balm over the pigment after it dried just to see of that would alleviate the dry feeling, but it just left my lips feeling sticky. The pigment payoff if worth the process of application and getting acclimated to the dryer consistency of the product. I gravitate towards cool tones and darker colors for lips since my eyes are usually natural and subtle. I know the whole point of having liquid lip colors is to end up with a matte finish, but I may have to pair some of these with Clinique’s “Air Kiss.” This has been a favorite since Emily introduced me to this product years ago, but since then, it is incredibly hard to find, so for that reason, I have left it out of my rankings.  Top Left: Elf "Tea Rose" Top Right: Elf "Wine" Bottom Left: Wet 'n' Wild "Rose to the Occasion" Bottom Right: Wet 'n' Wild "High-Pitched Wine" 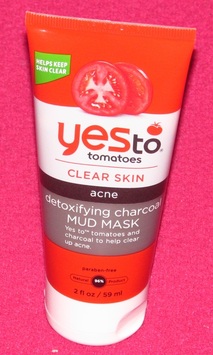 The last product to round out my long list of favorites is a charcoal mud mask. I am all for some skin care and clearing up my pores. I was not sure where to begin when it came to picking a brand. My skin is somewhat sensitive, so I did not want anything harsh and full of chemicals. The brand Yes To (tomatoes) is a mostly-natural company, and after looking into it some more, their backstory is great too. This is the first mud mask I have ever used. I did not know what to expect, but I was happy with the process. It went on easily and came off the same way. I kept the mask on for fifteen minutes before removing it with warm water and a washcloth. It left my skin feeling refreshed and rejuvenated. I will definitely be adding this to my beauty routine here and there.
It is so fun to play around in my makeup drawers and to mix and match products. Although I have no problem walking out and going to school with a bare face, it always feels nice to put a complete makeup look together. The motto, “look good, feel good,” definitely rings true for me. Sometimes, makeup is the best medicine to feel my best. I do not know what I would do without a few of my favorite things. Stay Curious, Kayla ©Inquisitive Perspectives 2016 |